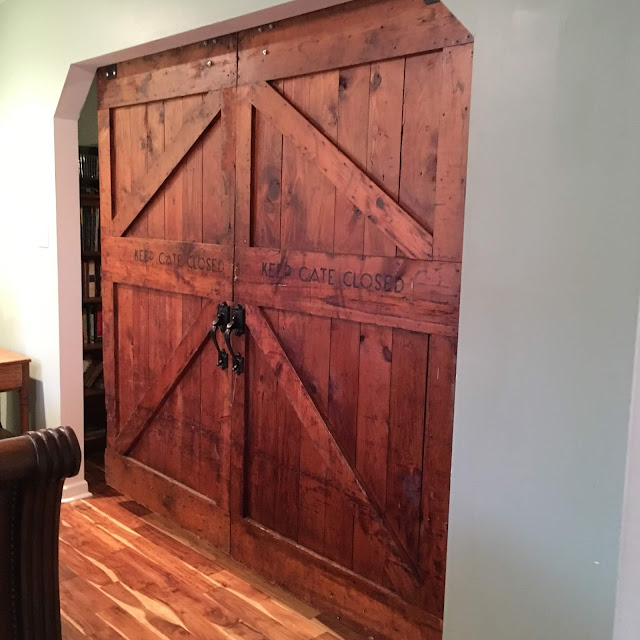
The most astounding part? The doors, with a track and rollers, were priced at just $300. I had to have them. We'd been looking for something to separate our master bedroom from our office.
What you don't see in this picture is the other side, which was layer upon layer of paint. I didn't want paint, I wanted wood, like this side. So I had to figure out the best way to strip it all down.
I started with paint stripper.
This method turned out to be a total bust. No matter what technique I tried was an absolute struggle. Leaving it on for too long caused the door to just like eat the stripper, but not putting it on long enough caused it to not penetrate enough. I was fed up. I then turned to trying to sand it all off.
This was also dumb. It took too long to get through the layers, and I was burning through sanding discs every five minutes. FINALLY, after posting about these difficulties, my friend Cari Cucksey suggested using a Wagner heat gun. Being that she's the queen of refinishing, I trusted she knew what she was doing, so I headed to the hardware store, expecting to pay $50-60 at least for this heat gun. I was surprised to find out it was only like $20! To top it all off, it was the PERFECT solution for this. I bought a real paint scraper along with the gun, and in what seemed like no time, I had one door stripped.
I then went two passes with coarse and fine sandpaper and finally the door was ready to be sealed.
I opted not to stain, since I knew adding just straight poly would darken the wood quite a bit. I bought a gallon of satin poly and a bunch of foam brushes and went to work.
You'll notice that I didn't go so crazy as to get every last spec of paint out of the door, as I thought they would look really cool with a little bit of paint in the knots and old nail holes, giving the door a bit of depth and character.
As for the non-painted side of the doors, I decided not to sand them at all, since I didn't want to lose the stenciled "KEEP GATE CLOSED", so I cleaned it up as best I could and then started spreading the poly on. It was a dirty, splintery job, but it worked well and I'm glad I did it.
I then worked on the second door, and they were ready for hanging. Time to prep the tracking.
The track and rollers I got from Odom, but the handles were from our new (to us) front door - the handles that came with it were non-operational (and brass), so we had to replace them. But they were so cool, I held onto them, and lucky I did, cause they were perfect for this job.
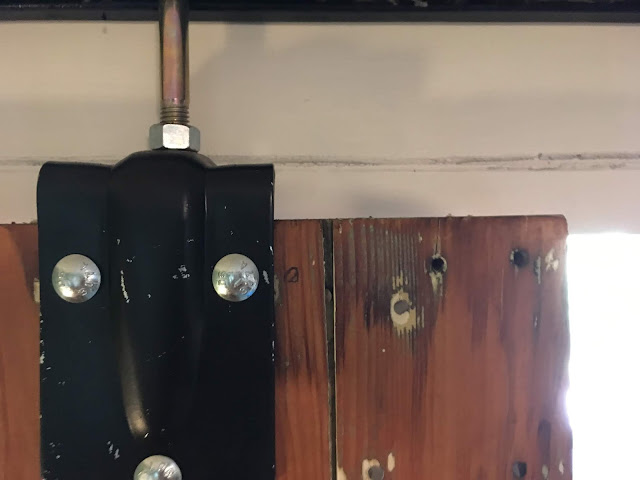
After painting them all black, I hung the rail in our bedroom. This was a fight I didn't take photos of, but long story short, the hangers did not work for our application, so I ended up buying new rollers from the hardware store, cutting bolts down to fit, and eventually getting to a point where the thing would slide along without issue.
You see above that the bracket was scraping the wall - I added some spacers on the railing hanger bolts so that it would come away from the wall a bit to not scrape.
You'll also notice that the doors hover above the ground and don't quite fit the doorway. I knew that going in, and wasn't sure what my plan was going to be. I ended up buying some more old reclaimed wood from Odom and cutting it to create side and bottom wings, along with a center piece to cover the gap that happened where the doors meet.
Again, the prep of those boards was a little annoying, but this time just one layer of paint came off easily with sanding.
And again, not going crazy with the sanding allowed me to get some cool paint and damage grain look in there.
I attached the sides using the Kreg jig (pocket holes & screws, and then the bottom and middle piece with interior wood screws. I was worried it would look slapped together and the wood wouldn't match, but the bottom and center spine match perfectly, and the wings are a little different color, but it's hardly noticeable.
We knew we were going to eventually paint this room white, so I painted before I mounted the hardware so it was easier when that time came, so please excuse the unfinished look of the wall above the doors.
Now it's much easier to cool or heat our room, since we can close it off and not have to cover the entire office and closet.


